
Tuesday, July 3, 2012
Sunday, July 1, 2012

Monday, June 18, 2012


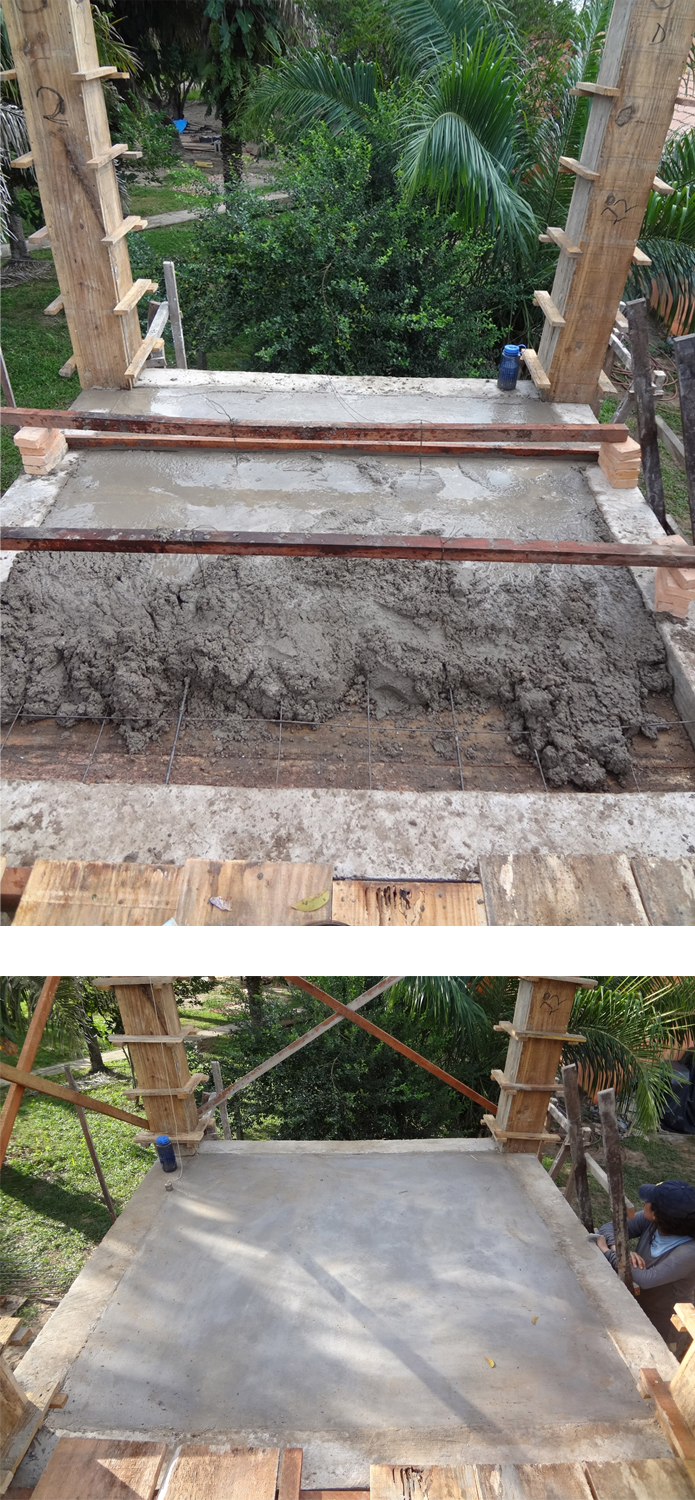
Installing the cages takes a fair amount of time and for the Second Tier Bond Beam much of the fabrication had to be established in place. For this install the build team had additional help from Corey and Ethan who installed much of the cages with the help of the now seasoned cage fabricator, Chris. Corey and Ethan also poured the Second Tier Bond Beam.

The form work for the second tier bond beam is crafted in such a way that there are no yokes to impede the flatwork/finishing that has to take place to the top of the bond beam. It is poured as one continuous unit to eliminate any cold joints and for greater structural integrity. Much of the form work is built in place and supported to the structure below.


Saturday, June 16, 2012

SYSTEMS + TECHNOLOGIES
At the site of our school and water tower builds there are a variety of systems and technologies that are currently implemented and proposed for this year. These systems include: solar power, solar thermal, rural internet, bio-sand filter, and a fast sand filter which is diagrammed above. The basic sketch diagrams the staging of tanks that will be used to filter out the iron that is very present in all of the water that feeds the school and lodge. In addition to the tanks there will be two solar panels, a solar pump that drafts water from the well, and two float switches that will control water flow and timing. This system can be expanded to meet local needs of potable water with the addition of charcoal tanks which are used locally for drinking water at a near by ranch. For now the water tower and filtration system target the removal of iron from the well water. The new tower will also be taller than the last and in turn produce greater water pressure.


A system that would provide internet through cellular signal amplification was designed by e-magine at the University of Michigan specifically for rural and remote regions. The system includes a signal booster, modem with sim card, router, a directional antenna and arduino technology to respond to humidity. A viable internet connection has not yet been realized but through strategic testing we have targeted specific issues that will be tested out to pinpoint and resolve the problem. Currently we believe that we need either more height on the antenna or there may be a problem with our signal booster. There is also a general question of what signals can be amplified and if cellular and data signals are fundamentally different and if so, is there a viable signal close enough to be amplified.


This year a team of engineering students implemented a bio sand water filter at the site and at other schools in the area. This is the third year of research and implementation of this filtration system and this year the team seems to have come close to perfecting the system itself. The variable that remains is the question of how well and rigorously the filter will be maintained by the locals. The desire for clean potable water in the area would suggest the necessary incentive. Particularly when (like this year) the drinking water is brown, what the locals refer to as chocolate water.
Friday, June 15, 2012

WEEK FOUR
In week four the delays piled up, our team became smaller, yet we managed to get a fair amount accomplished once the materials did arrive to the site. We poured a bond beam which was already formed, poured two slabs (one on grade and one as a ceiling), two retaining walls, poured the Second tier columns, and laid the brick foundation for the closet. We have begun to work long days (sometimes completing a pour before breakfast) due in part to losing a week because of delays. The weather continues to be extreme. Sometimes extremely hot and the mosquitoes continue to be crazy. This has become somewhat stressful but all in all the quality and work ethic of the 2012 build crew has shown, literally working through the madness to prevail and hammer out lots of work in week four.

(TOP) We decided to hitch a ride on the back of a materials truck to get from Pocone to the site (3.5 hour drive). The truck broke down and we spent 6 hours on the side of the road waiting for a mechanic and getting back on the road.
(BOT) The second load of material was sent on a truck that would get stuck at the site and therefore the drive had to dump the sand on top of the gravel. This was a problem and a fair amount of added labor to sort the sand and gravel.

While I install reinforcement for what is to be a cast in place concrete ceiling Alli and Chris fabricate the cages for the second tier bond beam. After pouring the Tier one bond be we removed the formwork which we will reuse for the third time to pour the Second tier columns. The bond beam looks great.

While we were waiting for the bond beam to cure to a more solid state the team worked on foundations and retaining walls that would allow us to stage filtration components at different elevations so gravity can move water from station to station. A foundation for the closet is also integrated into the larger system. Some pipes are installed in the foundation to allow for us to fish electrical wiring through for the solar pump and float switches which will be installed in a couple weeks.

In one bay of the water tower there will be an enclosed closet at the ground floor. We have installed a mix of #3 and 4.2 mm rebar as a mesh reinforcement. I have woven it together in an attempt to create what would be considered a welded wire mesh and have attached the mesh to the bond beam cages prior to pouring the bond beam. Here we are forming the slab to be poured.

Saturday, May 26, 2012

WEEK THREE
Week three included mainly the installation of the bond beam
cages and formwork which has taken some time, in part because a critical team
member Allister has departed and headed back to the states. Along with the
construction of the bond beam, Jim and Julie have been testing a submersible
solar powered pump that will pull water from the 10m deep well to two 2500L-holding
tanks. Jim and Ethan are also
working on a remote cellular amplification internet system designed by E-magine.
Due to a string of bad weather and rainfall our schedule is
beginning to get a bit tight.
Heavy rains and thunderstorms have made the dirt road virtually
impassable and our materials are a week behind schedule for delivery. We are able to keep busy regardless of
the rain but are in need of material to complete the water tower.
Prior to my arrival to the Pantanal this year, I have been
on the receiving end of bird feces two times. I have been crapped on three times in the three weeks that I
have been here; on the shoulder, wrist, and head. I am also putting forth that on one of these incidents I was
targeted by one of the world’s most endangered birds, the Hyacinth Macaw.
Jim and I have also taken time to do some work on the school
by organizing wiring for the solar panel system, adjusting doors, and hanging
plumbing fixtures.
Currently we have our bond beam cages in place and the form work installed. We are waiting on a material delivery to stub out rebar for a concrete ceiling slab and then we can pour the bond beam in one shot, leaving the ceiling to be formed and poured afterward.


The evening before our drive to Pocone to pick up Mercedes: Julie, Chris, and Allie picked fresh limes from a near by tree. Julie made caipirinha's with the limes, sugar, and cachaca. During our drive up the Transpantaniera Highway we encountered an old fashioned cattle drive which is common along this route.

WEEK TWO BLOG
During week two we installed all of the column formwork that
was fabricated by Chris and Allister, while Jim, Alli, and Julie continued to
assemble the cages for the bond beam.
By weeks end we poured all of the concrete columns, removed the
formwork, and have begun to install the cages for the bond beams. We have also dug a big hole to house a
5000L tank that will hold filtered water prior to pumping it up to elevated
tanks that will then gravity feed the water to the lodge and school. The filtration system is intended to
remove much of the iron that is heavy in the existing water. Testing for potable water within this
system will begin in a couple of weeks.
Otherwise, a team of engineers is working on sustainable bio sand
filtration systems.
In 2010 I blogged a detailed description of the form build. What follows is a more comprehensive detailing of the cage build.


I found this piece of aluminum angle that we use with a simple jig to fabricate the stirrups that make the cage that reinforce the concrete columns and bond beams. Notches are cut in at two points as a pass through when fabricating the stirrups. Two notches are needed because two dimensionally different stirrups are being fabricated. One size for the column and a different size for the bond beam so they and intersect easily.


WEEK ONE
Upon arrival to Cuiaba we were a pack of 13 people who are
trying to make our way somewhat deep into the Pantanal Wetlands. This proved to be a challenge. The Combie (VW bus) broke down on
multiple occasions, including one incident when Ethan and I repaired a rear
strut with the removable housing on a multi tip screwdriver. We repaired the strut twice on our way
to the site. The dirt road and its
bridges are in poor condition which makes the trek that much more destructive.
This year I have arrived a month earlier than in 2010 and it
is a bit wetter with much more mosquitoes. A dry summer has left the area with
water sources that have larger amounts of iron in it, turning it a brownish
color. It has become clear that
the lodge, school, and house, have had little upkeep over the summer and now
are showing the signs of this environment leaving them somewhat beat down.
It is clear during week one that the build team is roaring
and ready to go and by weeks end it is clear that this crew is competent as
well. We moved fast through the
excavation, cage build and the form
build and stood our cages by weeks end.
As has historically been the case some site conditions and
decisions have arisen that have led us to choose a different site and program
for the prospective water tower.
We will be design building on the fly with some schematic engineering
notes that Julie worked up prior to our arrival. We are currently working on
one water tower that houses two supply tanks that will receive water through a filtration
system that includes, a settling tank, gravel + sand + charcoal filters, and a
holding tank. Water will be
supplied from a near by well that is pumped up via solar power and will gravity
feed through the system in two stages. To my dismay but not surprise my design
will not be built and we will in turn focus on a simple quick build and give
some more attention to the school/research facility that we constructed in
2010.


Wednesday, May 9, 2012

Day two entailed replacing two of the tires on the "Combi" - VW Bus (top) that PCER had purchased in 2011, a quick interview with Channel 7 (mid) news, and the bio-sand filtration team (bot) headed down the Transpantaniera to the initial site where we had build the school in 2010. The "BUILD Team" hit the town and finished gathering materials necessary to construct the concrete structural frame and accomplished other miscellaneous tasks necessary to get this ball rolling. We will be headed to the site tomorrow. A fairly efficient beginning to the summers mission.

Day 1 + Transit was not without adventure. The top image is prior to our first attempt at landing in Cuiaba, Br and the lower image is our final descent on the second try. Upon our initial descent into Cuiaba it was clear to Chris and I that we were attempting a landing into fields of farmland. We were very low and literally, 5 seconds after Chris said to me "it looks like we are landing into nothing" the plane jerked upward and aborted. At that point we flew in a direction that was not a circle and seemed as if we were attempting our final descent at a totally different location. But we are all here safe with most of our luggage and operating in Pocone,Br for the time being.
Monday, April 16, 2012
Design Proposal 2012

Where We Are

Monday, October 4, 2010
Week 12

Week 12. The roof construction process is complete. 1. Trusses installed. 2. Ridge and minor beams installed. 3. Caibros/Rafters installed at 60cm on center. 4. Ripoa/Battons installed at 34cm on center to correspond to roof tile dimensions.
Week 11

Week 11. The main project of week eleven is the construction of the roof system. Also, as pictured in the top right, the floor is tamped down in preparation for a slab which is one of the last components (due in part because it is colored concrete). Also shown above (bottom right) is a scaffolding system and (bottom left) the roof monitor.
Truss Install

The installation of the truss is a muli step process where as each truss is set upside down on the bond beam and turned up individually using long sticks. The sticks are used as braces to temporarily hole the trusses upright. A long stick (rat run) is placed on the collar tie of each truss to stabilize the bottom and an angle brace is installed to keep it upright. On center dimensions are measure out on the rat run and the truss is plumbed up with the brace. This is a temporary measure until the ridge beam is installed. The rat run also acts as scaffolding in this scenario.
Roof Monitor

The roof framing includes a roof monitor that is positioned as a means to ventilate the building and take on indirect natural daylighting.

Hardware

Hardware is strategically used. In the truss it is located at all joints and to hold down the viga/beam cleat (left). Straps are used at the shiplap of viga/beams that break off of the structural trusses and columns (top right). Rebar that is extended past the beam is bent over to tie it down to the column (Bottom Right).
Door/Window Jambs

Door and window rough openings are oversized to accommodate nails that are situated prior to installation of the jamb. Once all the jambs are set (bottom, then top, then sides or as a framed unit) the gap is filled with mortar (massa) which consumes the nails and secures the wood in place.
Wall Covering Reboco
.jpg)
The wall finish is a 2 to 3 step process. Much like cementatious applications in the U.S. (as opposed to synthetic) it is a three step process in most cases. Above we see the chapisco (scratch coat) method where the looser mixture is flung against the wall to create a rough surface for bonding. This is sometimes done by flinging the mixture through a screen 2cm x 2cm grid. The second coat emboco is much like a brown coat and the third is the finish, reboco.

Bond Beam Unveiled

After 2+ days of curing time the bond beam formwork is released and all of the metal infrastructure is cut flush.
Subscribe to:
Posts (Atom)