Monday, October 4, 2010

Week 12


Week 12.  The roof construction process is complete.  1.  Trusses installed.  2.  Ridge and minor beams installed.  3.  Caibros/Rafters installed at 60cm on center.  4.  Ripoa/Battons installed at 34cm on center to correspond to roof tile dimensions.

Week 11


Week 11.  The main project of week eleven is the construction of the roof system.  Also, as pictured in the top right, the floor is tamped down in preparation for a slab which is one of the last components (due in part because it is colored concrete).  Also shown above (bottom right) is a scaffolding system and (bottom left) the roof monitor.

Truss Install


The installation of the truss is a muli step process where as each truss is set upside down on the bond beam and turned up individually using long sticks.  The sticks are used as braces to temporarily hole the trusses upright.  A long stick (rat run) is placed on the collar tie of each truss to stabilize the bottom and an angle brace is installed to keep it upright.  On center dimensions are measure out on the rat run and the truss is plumbed up with the brace.  This is a temporary measure until the ridge beam is installed.  The rat run also acts as scaffolding in this scenario.

Roof Monitor


The roof framing includes a roof monitor that is positioned as a means to ventilate the building and take on indirect natural daylighting.

Roof Framing

Hardware


Hardware is strategically used.  In the truss it is located at all joints and to hold down the viga/beam cleat (left).  Straps are used at the shiplap of viga/beams that break off of the structural trusses and columns (top right).  Rebar that is extended past the beam is bent over to tie it down to the column (Bottom Right).

Door/Window Jambs


Door and window rough openings are oversized to accommodate nails that are situated prior to installation of the jamb.  Once all the jambs are set (bottom, then top, then sides or as a framed unit) the gap is filled with mortar (massa) which consumes the nails and secures the wood in place.

Wall Covering Reboco


The wall finish is a 2 to 3 step process.  Much like cementatious applications in the U.S. (as opposed to synthetic) it is a three step process in most cases.  Above we see the chapisco (scratch coat) method where the looser mixture is flung against the wall to create a rough surface for bonding.  This is sometimes done by flinging the mixture through a screen 2cm x 2cm grid.  The second coat emboco is much like a brown coat and the third is the finish, reboco.

Roof Tile


Roof Tile Delivered!

Bond Beam Unveiled


After 2+ days of curing time the bond beam formwork is released and all of the metal infrastructure is cut flush.

Week 10


Week 10.  The major task of week ten was finalizing the bond beam formwork and pouring the beam.  There were a variety of other task begun such as scaffolding construction and column surfacing.

Column Reboco (Stucco)


The finishing process for the veranda columns is detailed above.  A caliper shaped jig is used to hold two straight edges in place as a formwork for the reboco/stucco brown coat.  

Bio Sand Filter/Solar Power


The bio sand filter has been tested and works properly.  One of the solar panels mocked up and tested.  They will ultimately be situated on the roof with the angle of the roof being designed to the optimal specs for solar orientation.

Bond Beam Pour


Once the formwork is ready to go concrete is mixed and poured.  The bond beam is poured in one shot with no seams.

Bond Beam Pour


One local trick seen above is to fill any large gaps with wet paper for the cement bags.  This is executed only where the bond beam dimension exceeds the minimum that is specified 20cm.

Week 9


Week 9:  This week interior and exterior walls block-work are completed (for the most part), four structural trusses are fabricated, and the bond beam formwork is installed and ready for concrete.  It is also James' last week on site, leaving John, Ethan, Giorie, Julie, Joao, and Eder.  A cold streak has subsided at least for now.  

Bond Beam Build


The bond beam formwork is made up of the column formwork that was salvageable.  A streak of cold and cloudy weather made it so more formwork could be reused.  The blistering sun often saps the moisture from the wood causing cracks and splits that compromise the integrity of the formwork.  (Note)  On the same note during the hot and sunny days, when formwork is dismantled it is beneficial to wet the exposed concrete a few times a day for a few days so the moisture is retained at a pace that increases the strength of the concrete.  Formwork joints are staggered from exterior to interior and a gusset is installed at each joint. 

Bond Beam Build


The thickness of the bond beam is consistent with the column at 15cm.  The wall thickness is 9cm.  Therefore the 6cm caibro (wood member) will suffice in padding out for the void that is created.  It is screwed to the bottom of the formwork on the interior side of the wall.  4/2 rebar is drilled through the formwork and bent over on each side to prevent a lateral blowout.  Additional cross members are screwed to the top and wire is wrapped completely around the formwork.  All formwork is flushed to the top and leveled from the top to ensure that the trusses and roof system plane out properly.  Shown above is the bond beam and metal retention members being bent with a pipe found on site.   

Trusses


Trusses are completed and await metal hardware that are applied at all the joints for additional support.  Pictured above (top) are the millwork (our lumberjack-left) and fabricator (right).  Trusses will be installed after the bond beam is poured and given time to set properly.    

Walls and Bond Beam Cage


Mercedes, Giorie, Pedreiro, and Servante worked on building up and weaving the walls while John, Ethan, and Julie installed the bond beam cages and James completed the fabrication of the structural trusses.  Walls that meet at corner or "T" conditions are woven together whereas every other course block laps the previous block perpendicularly.  Masons line and the plumb bob are the tools of choice for level and plumb and squaring the space is a matter of keeping an eye on the diagonal dimensions of the space. 

Outfitting


 Plumbing supplies and other hardware arrived on site which made it a bit easier to understand the wastewater and delivery connections, dimensions, and placement of stub-outs and the larger gravity feed water systems.  Much like North American coding it is done by color where brown pipe is used in exterior conditions and white in interior.

Friday, August 6, 2010

Week 8


Week 8 was a big week for a multitude of tasks on site. Waste water infrastructure has been installed for the two bathrooms of the school and research facilities by Ethan and Julie as seen in a following photo spread. The gray and black water have been piped separately for the opportunity to recycle the gray back into the gravity feed system that flushes toilets. The septic style pit has been built up by various workers and completed by Mindy and Max (also shown in the water photo spread).

All columns have been poured and above is a series of close up images of ten different columns. One of which the concrete was mixed on the ground. For the majority of the columns the pedreiro Joam has been mixing and the reddish tone is a product of the procedural steps in mixing in the bitonera (concrete mixer) as opposed to on the ground: Ground Mixture: sand, cement, and aggregate are mixed dry and then water is added. Bitonera Mixture: Aggregate then water then cement then sand then water = red concrete. (the aggregate being red)

Form Removal


Column form installation and removal was made exponentially easier with the arrival of Mercedes who brought with her a cordless 18v li-ion Makita Drill/Driver set (model: LXT 211A). More small things arrived on site this week, with Ethan having come back from Pocone, such as 30 meters of electrical cord, 300 screws, and drill bits.

Column Field

Bond Beam


The bond beam rebar infrastructure as shown above being installed by Ethan, Julie, and John. Each section is pre built by Joam and contains about twice as many retention rings as the vertical columns. Each vertical column has four rebar stub outs that tie the bond beam to the column and the bond beam will contain rebar stub outs that tie each truss to it.

Truss Build


Week 8 has included the building of the four main structural trusses that will be exposed to the interior space and carry the weight of the framing and roofing loads. John and I designed the truss to a specific angle specified by our solar systems engineer and began the build. They are currently cut to fit and tacked together with screws and will eventually receive metal strapping and hardware at all planar connections. The wood type is Piuva, a Brazilian hardwood and is rough sawn at best. It is milled to size with a chain saw (plain sawn technique) and the accuracy is excellent given the tools and conditions. Attention is paid to thickness when cutting stock for the king post and intersecting cords and crowning for all sloped and horizontal members is in the upward direction. The king post is left un-cut at the top where it will receive the ridge beam so fine adjustments can be made according to the varying dimensions of material that it will receive.

Wall Preparation


Week 8 brought with it four new people (Mercedes, Giorie, Dick, and Diane. Above - the finishing touches of the tijolinha foundation and the beginnings of the infill wall installations. At every third course of the tijolo (8 hole) wall system is a piece of 4/2 or 42 mm "rebar" (ferro)set in the mortar joint and drilled into the column. It is additional lateral support with the anticipation of childhood energy and futbols acting up against the parede (wall).

Tijolinha Header


The header system was initially intended to be the bond beam but was revised with the realization that there was going to be too much tela (screen) and it would demand additional un-needed mullion infrastructure to support it. The roof loads will continue to be transferred through the bond beam to the columns and the header height and structure for all openings has dropped to the 215 cm. The tijolinha header will have to support only itself and the small sections of wall above. Its' construction (as pictured above consists of a wood formwork (cut from off cuts of column form), two pieces of 3/8 or .8cm rebar that is buried in the first mortar joint (massa), two courses of tijolinhas (the smaller brick), and tijolos oito furros (8 holes) above with 4/2 rebar in the mortar joint. A plumb bob is used to check for plumb and dry line is set in each course level (nivel) and strait (reta). The initial header height is pulled from the FFE (Finish floor elevation) dry line and snapped across all coloumns.

Waste Water


The plumbing infrastructure is installed within the "water bar" of the initial design. Water delivery will come from above and waste water will terminate below ground: all of which exist within the same bay in plan, localizing the water systems. Separate piping is run for sinks/showers and toilets. Black water being 100mm and gray being 40mm.

Thursday, August 5, 2010

Week 7

Form Station


John and I set up a work station for laying out and building the form boxes needed for concrete column construction. The delivery of the electric saw and 14 pieces of form work have allowed for a more efficient production process.

Layout

Assembly

Form Field


The form work construction evolved into a much more strategic and directed endeavor due to previous failures. In this image one can see the new form work. It is set around the rebar infrastructure with one face off. After the face (which is labeled with a circled letter that corresponds to the column letter) is installed, braces are applied (to get close to plumb) and heights are measured from the FFE (finish floor elevation) dry line. note: the dry line has been reestablished to account for the thickness of the form rather than the finish column. In doing so we know that all columns are level and generally plumb. When shimmed to the correct height the bottom is "pinned" with stakes and a variation of materials that land us on specific dimensions. Using a plumb bob the forms are plumbed in perpendicular directions and the braces are wired to stakes that have been set in the ground. We have also been checking diagonals in plan and elevation to make sure that all is square which has been the case being that we checked our dry lines time and again. A triple check has been measuring parallel dimensions at the base and tops of the columns. These forms have been successful and we have been getting three to four uses out of them in the overcast weather. When the wood sees much sun it warps and splits at a rapid pace. We butter them up with old cooking oil two times.

Form Failure

Re-Design

Triumph


This week (unusually cold) began with high expectations and our first real disappointment on the construction site. Although our first and second concrete column pours were a success the third and fourth would prove to reveal the instability of the initial form design. Furthermore, with the departure of architect/pedreiro’s apprentice, Nisha Patel, we have lost one of our strongest assets, both on the job and in design, which is a perpetual state in which we operate.
The initial form design deviated slightly from that which we have encountered thus far and may be one of the main reasons for its eventual failure. Due to the fact that we were ripping formwork by hand and each cut was taking between 20 and 30 min, we chose to rip only one piece, which gave us two sides of the form, and the other two sides ran long. Typical in the area is to have all pieces ripped to size with no excess, and nails attaching one piece to the next and wire (similar to bailing wire) wrapped around the form at about a 40cm interval. Well the third column became “pregnant” which is not uncommon, but the forth one blew out which we are told us also not uncommon by Joam. With one form still standing and un-poured John and I aborted the pours for the day and spent some time in the evening re-working the form design.
The new design included all pieces cut to specific lengths, screwed together for reuse, with a series of ribs spaced to resist the greatest outward force of the concrete load, and wrapped in wire. This was made easier with the arrival of an electric “Makita” or small sidewinder/circular saw Bosch GDC 14-40 with a cut depth of 40mm. The new method has worked exceptionally well and is only slowed by the fact that much of the column assembly has to be screwed together by hand. We have an electric drill but lack enough cord for it to reach the slab site, so we are assembling three sides permanently and installing and pulling the “face” of by hand. Thus far concrete and tijolo columns are going well and the system that is in place is working well.

The Children

Census Data

This week the remaining group excluding myself ventured off to Porto Jofre and various other river villages to collect census data of the potential student population that will be utilizing the school. This included a trip out on the Cuiaba River and the delivery of some soccer balls that Greg (water systems) brought down from the states. The numbers exceeded expectations rounding out to approximately 20 students. Also, registration paperwork (to legitimize the school) has made its way to the secretary of education who is (at this point) offering funding for diesel for the school bus and other necessary components in the operation of a rural school in Brasil.

Thursday, July 22, 2010

Week 6


Gersione returned for an extended stay meaning the large generator has finally been fixed. After blowing 3 outlets and one cord, we (really, Gersione) finally figured out a way to get the bitornera (concrete mixer) going. He also happened to bring an electric water pump with him. With these developments, concrete for the interior columns and mortar for the exterior have been at our disposal without too much extra work. On site, the columns are going up quickly as they have been the primary building focus for the three architects and Joam. This has allowed a couple of us to focus on interior columns and a couple of us on exterior columns.

Other major events:
_While James was performing the job of eco-tour driver (for the second time since we’ve been here) during a night ride, we saw a taper
_We managed to stop working for a bit and catch the second half of overtime of the final match to see Spain win the world cup for the first time ever
_The GIEU has departed and in 3 weeks time, another pedreiro (Elano, who, we mentioned before, is working on a project up the road and has provided a lot of helpful tips and tools to us) and his two men (they call men who work for pedreiros “servants” here) will arrive and focus on constructing Phase 2

Working It


We have finally been joined on site by a pedreiro (or building master) named Joam from the city. He has been working in the field of construction for 30 years but never with a woman or with Americans, both circumstances he seems to welcome. The communication was very difficult at first as he didn’t speak the clearest Portuguese (Ethan went so far as to claim that he was speaking another language, altogether) and our Portuguese is relatively slow but soon enough we were able to understand each other and communicate by showing/doing as much as possible. One of our biggest challenges is to keep up with the pedreiro’s very fast pace of working. This requires that we adapt quickly to his work methods while foreseeing the next step in the process. Once finishing all of the bond beam rebar towers and remaining column rebar towers, the next logical step for Joam was the exterior veranda columns (pier footing, rebar, retention brackets, mortar, oito furo bricks). In the meantime, we poured all footings for interior columns, constructed formwork, and began to pour the columns (composed of wood formwork greased with expired soy bean oil, vertical rebar, rebar retention brackets, rebar braces (15 X 20) to hold the formwork in place, and concrete). Another major task on site concerns the water team. They have been working away (with the helping hands of GIEU students) on the construction of the septic tank/leeching facility which is made from oito furos with the occasional brick turned sideways in order to let materials seep through. They have also been cleaning materials for their water filtration system. Both of these tasks are near completion. We also fetched the wood from deep in the forest where it had been cut and moved it to the roadside. This required a lot of bug spray and some night time adventures to move the wood from the side of the road to the building site.

Clockwise: Our “metal shop”: cutting rebar for the rebar towers, bending rebar retention brackets, assembling rebar towers; All hands on board for the pouring of the first column (we were determined to pour it that day and were trying our hardest to beat dusk); Construction of a veranda column; Placement of formwork for interior column

Monday, July 5, 2010

Week 5


Progress


We have had a good push on the excavation of both phase I and II with the helping hands of the GIEU crew. Large septic pits have been dug and the trenches and footings are near completion. All the while, the in-ground brick work that acts as both a structural footing for the infill wall system (tijolos) and a form edge for the interior slab has been completed on Phase I. Excavation cut from the septic and structural systems digs has been reused as fill in order to reach an FFE (finished floor elevation) that is consistent with the existing house. Infrastructural columns of rebar (ferro) have been built and installed. They are set in concrete footings (40x40x60 cm) and braced to establish an accurate stub out at the footing. Rebar above the footing will be manipulated at a later date in preparation of column formwork. The production and process of building and setting columns has been one of invention, correction, and common sense. Local knowledge and advice has been graciously availed to the crew and employed in most cases. It is sometimes the case that we utilize different tools or techniques than suggested as our own experience prevails in the decision making process. It is also common that suggestions vary from pedreiro to pedreiro (construction managers) and the locals. As it stands now we are moving vertically out of the ground with the main structure of the interior structural frame and setting up for the veranda brick work to begin. Nights are often spent drawing details that have evolved, discussing strategies for organizing a large unskilled labor force, and deriving cut lists for materials and a lumber package. We met with our local lumber supplier/millwork and discussed the derived cut list for the roof system (four structural trusses in the north/south direction that carry three beams (vigas) in the east/west direction, that carry all the rafters (caibro) in the n/s direction that carry all batons (ripom) in the e/w direction, on which sit the dry stack roof tiles). We were able to get a look at some of the vigas that have been cut for our job and so far the cuts look good and straight (reta). The vigas are being milled at 6m lengths and are coming from a local tree species called Piuva, which is a dense hardwood. The rafters will be of the same species at varying lengths and the batons will be of a softer species due to the amount of nailing involved to secure it to the rafters. All other materials are being delivered at a steady pace at one to two deliveries a week. We expect the deliveries to slow due to the fact that much of the necessary materials are currently on site. Occasional trips to Pocone are used to blog and pick up some needed tools and materials and this trip we will swap out the motor for the concrete mixer that had never operated properly.
Plumbing stub outs for in ground wastewater are being dimensioned and two options for water delivery are being weighed. As for the luxury of a concrete mixer, the primary generator is now up and running but the motor on the mixer is and has been in no shape for operation since it arrived on site. All of the concrete mixing remains on ground. Our current water supply for mixing concrete and mortar is coming from an existing well that was at one time the source of water for the existing house. Initially we lowered buckets into the well but have since moved up to a new manual hand pump that operates as if it were as old as the well. The water systems team is currently working on a bio filter that is made up of varying sizes of aggregate and sand that is sifted through a series of meshes that they brought with them.
General Notes:
_It is this week that Brasil was knocked out of the World Cup by Holland. It is a disappointment to say the least.
_The daily schedule for the design team (John, Nisha, and James) is now 6am-12pm 1pm-6pm
_Laundry gets done rarely and often only when it is absolutely necessary. We have all squeezed it in this week.

Local Knowledge


There have been various locals who have played key roles in advising us towards a more efficient way of construction as well as operating in the local field condition. Tito who has left for Cuiaba in anticipation of a newborn has been integral in a wide range from proper fence construction to plumbing repair to fashioning stakes. Gerstioni is the Jack-of-all-trades and one of our go to guys. He keys us into some of the other field conditions such as operating the generator and maintaining some of the equipment around. Elano is a pedreiro who is working at a lodge (posada) that is up the transpantaniera highway about 3km. He has lent us and fabricated some tools that have proven to be more efficient and fast (rapido) in the construction process. For example: We were using some found pipe to bend .42 cm steel for the retention ring assembly that is part of the rebar infrastructural column. Elano provided us with a bender that is made up of one piece of angle iron, three nails, and a board of wood. It works great. Images: From the left: Gerstioni (Driver and guide for Jaguar Ecological Lodge) with the water systems team, Gerstioni working on the concrete mixer, Tito (Very talented guide for the Jaguar Ecological Lodge) cutting stakes, Elano (local pedreiro) setting up and showing us how to use a local small gauge rebar bender, The wood milling crew.

Monday, June 28, 2010

Week 4


The water and waste management team joined us on site including Cory VonAchen and Greg Ewing (check out their blog which is linked on the left side of the page). Their first major project was to brave the intense stench of the septic tank to move it from the back of the house (where we will be building Phase 2 and therefore need to fill with concrete) to the north side of the house and new building. They have also been running tests on water flow rates and scoping out materials needed for their sand filter. The GIEU study abroad group, including 14 undergraduate students (from all different departments) and 1 instructor, Mindy Matice, has also joined us on site. The extra hands have made the work progress much more quickly. We finally reached a completion point with interior trench digging for Phase 1 and began slab formwork. We have reached the rebar level and will soon be pouring column footings. We got our first electrically operated tool – a concrete mixer! Unfortunately, the primary generator is down and the smaller, temporary one, may not be able to take it. That will be fixed “soon” though. In the meantime, we will continue to mix concrete by hand.
We were recently visited on site by another pedreiro who is currently working on a project down the street at another lodge. He approved of our work thus far but recommended that we dig shallow footings for the veranda columns and confirmed that the veranda columns should be full of concrete as well (regardless of whether they are constructed with brick + rebar or if constructed with PVC pipe – an option we are currently looking into. We have also had mixed responses to what concrete and mortar mixes are typically used and finally received a confirmation that our mixes were good – 4 sand, 1 sikal (equivalent to lime), 1 cement for mortar, and 3 sand, 2 aggregate, and 1 cement for concrete.

Our days of manual labor and nights of computer and drawing-related labor have been getting longer as we have been working out more construction details but we have managed to enjoy a few more world cup games – happily seeing Brazil and the USA continue onto the round of 16. We were also joined by a group of five enthusiastic writers, photographers, and videographers. They are making an epic journey through South America in an orange 1982 Volkwagon Westfalia and happened to get wind of the project we are working on. They stopped and worked with us for a day – helping finish up the trenches for the veranda columns (check out their website – inverdant.com). Milton (the cook) and Maria (the housekeeper) also hosted a little festa at their house (they live in the house on the building site) this week – there was loud music from car speakers, dancing, and cachaça. Saúde (pronounced “saw-oo-gee”)!

Pictured here are Cory and Greg with the gear they used to remove all the waste – buckets and masks; material arriving and being unloaded (it seems that material delivery is the one and only thing in here which happens as scheduled, we have been very impressed); mixing mortar using the “volcano” method (basically, piling materials, mixing materials into a mountainous heap, creating a crater in the middle, pouring water in the crater, shovel and mix materials, then repeat; the group enjoying a brick laying demonstration; an expert mason, in the making

Week 2-3


Between the visit to the construction site in Pocone and the arrival of more helping hands, we re-mason lined and water-leveled the entire site with respect to the finished floor elevation (FFE) of the existing house. This means we will need a lot of fill to get 4 cm (slab thickness) below the FFE but we cannot move the FFE because of the rising water levels during the wet season. While we were doing this, Ethan and Julie built a barbed wire fence around the entire site to keep the cows out, for once and for all (this is both to save our time of having to restring our lines but also for the safety of the cows as we begin to dig massive holes for the column footings). We also dug all 60 cm deep pier footings for all interior columns and began the trenches needed for the slab form work and moved a few electric poles out of our way (please note the OSHA-approved ladder in the picture).

Lesson One


The engineer was no where to be found so a few of our questions went unanswered, but here are the questions which were answered by the pedreiro (master builder):

Q: What are the extents of the slab? Building footprint? Breezeways? Roofline? Roofline, and then some?
A: Slab extends through veranda, entire footprint
Q: What is the slab thickness?
A: 4 cm. Our follow up question was, “Really, truly?! That thin?!” The answer was an astounding “YES!” We have also asked a handful of other people (including another pedreiro) and paid close attention to other buildings we have seen and that does seem to be standard.
Q: Is there rebar or reinforcement of any sort in the slab?
A: No.
Q: What size rebar goes where? And how many – how many in the columns (1, 2, 4?) and how many in the bond beams?
A: 5/16 rebar everywhere (which is .8cm), 4 go in each column and each bond beam, 2 rebar run in one of the mortar courses of the formwork,
Q: What is the maximum spread for the columns?
A: The pedreiro through out a 4, 5, 6 m answer, but this, of course, also has to do with what the dimensions of the beam between the columns and roof is. With the materials we will be using, we will maintain the 2m spread for interior columns and up the spread to 4m for exterior.
Q: Is there footing under columns? All the columns? What kind of footing?
A: Under all interior columns. Pier footing.
Q: What happens between the bond beam and the door? – Brick? Netting?
A: Courses of brick downwards from the bond beam to the door
Q: What is the height of the bond beam?
A: 20 cm (generally speaking, the pedreiro seemed to use dimensions based on the typical brick with mortar – 10 X 20 X 20)
Q: What is the dimension of the mortar joint?
A: 1.5 cm
Q: What is the typical order of building? – Specifically, what comes first the columns or the brick infill?
A: Brick infill for interior walls is last in terms of construction order. To give an idea of construction order for the interior:
1. Brick formwork for slab (concrete bed of 6-8cm, 7 courses of 4.5 by 9 by 9 bricks with 1.5cm mortar joints and rebar running all the way through after the 4th course)
2. Footing – including rebar
3. Column formwork, including bracing
4. Pour column
5. Remove column formwork
6. Bond beam rebar
7. Bond beam formwork
8. Pour bond beam
9. Remove bond beam formwork
10. Slab
11. Wall infill
12. Roof
Q: What type of formwork is used?
A: Brick formwork for slab. 10mm thick wood attached with wire for columns (check out PICASA!)
Q: What kind of tools will you (the construction supervisor) bring to the site? What tools do we need to get?
A: None. In fact, the pedreiro has not and will not be joining us on site. We are the pedreiros for this project.

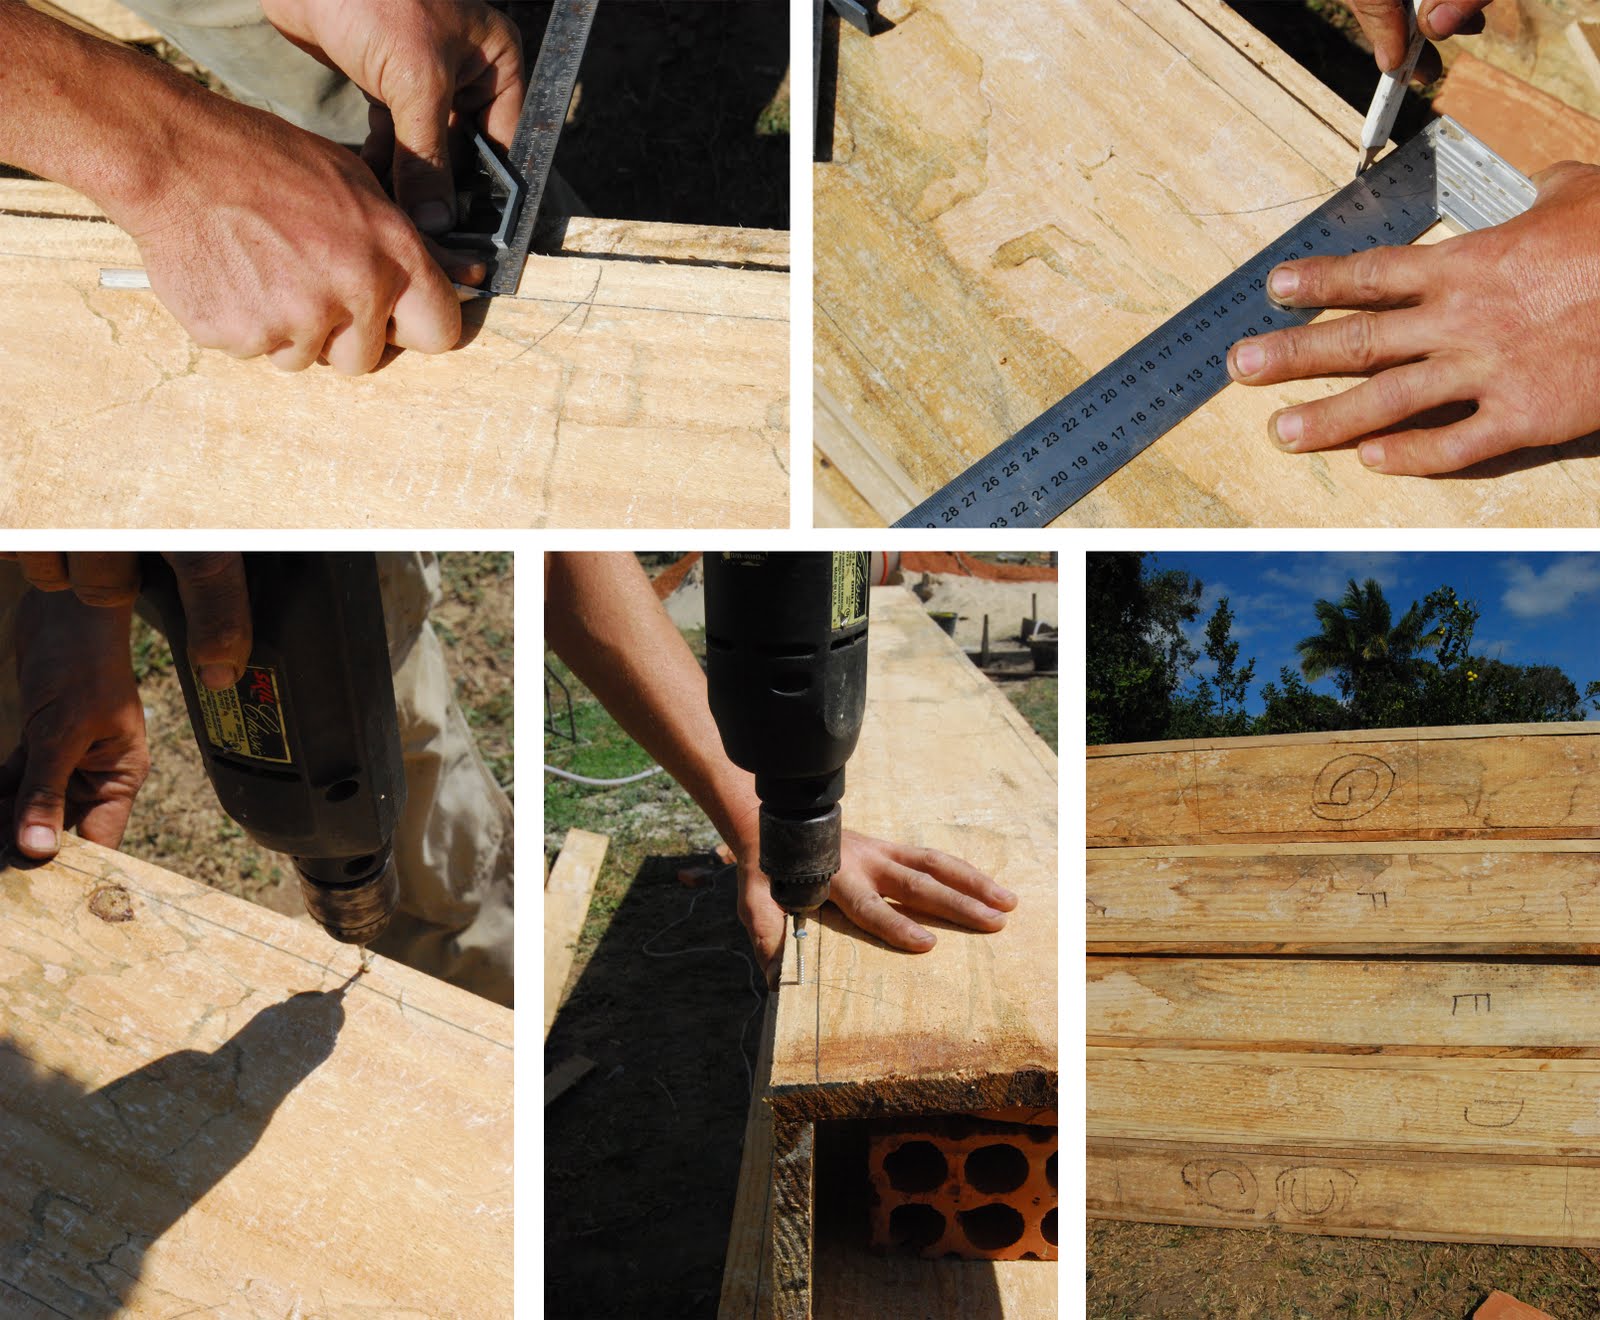
The pedreiro also demonstrated exactly how a typical veranda column comes together (pictured above). A couple interesting facts we discovered during this trip to town included that the standard footwear for construction workers seems to be flip flops and there are 83 bridges from Pocone to the Jaguar lodge!

Monday, June 14, 2010

Learning Flexibility


We got impatient with hearing “the site will be cleared tomorrow” and decided to take matters into our own hands. After moving large obstacles (posts, satellite, part of a fence, etc.) out of the way, we began the ground-clearing process. While at first, an excruciatingly slow process with the few tools we had at our disposal – a short-handled axe and a pick axe; eventually, we were able to borrow some long-handled hoes (enchada) and rakes (ancinho) from the neighbor (about 10 km away). We successfully cleared the site and are happy we will no longer have to hear that the site will be cleared “tomorrow, for sure!” The pictures show the tools we used and the site after we finished our work, check out Picasa for some before pictures. Next up, some more digging (we think) for the column footings.
Otherwise, we’ve continued to see new kinds of birds and other wildlife every day and had some near encounters with more jaguars. There was a funny moment when we were clearing the site the other day when we looked up and everyone (as in, the tourists at the lodge, the cook, the housekeeper, the neighbor – who happened to be stopping by, and a couple tour guides) was booking it down the road and frantically calling us over to join them – “Jaguar! Jaguar! Jaguar!”. A jaguar had just crossed the road about 40 feet away, having hopped out from the swamp, swept up a capybara (giant rat – as in, small bear size) and walked off into the swamp on the other side. All we were able to see were the massive wet footprints the big cat left behind. There were also a couple tourists from the UK who we got to know the last few days. We spent an afternoon with them down the road at the neighbor’s (also the Eduardo’s uncle) place where we set up a TV in the semi-enclosed porch, and with cows, chickens, and endless wetlands in the background, enjoyed the USA VS. England World Cup match. Thank goodness for England’s butter-fingered goal-keeper! The tie game allowed us to remain friends afterwards. Chasing jaguars and enjoying futbol: some expected field conditions!!

Learning the Language (Construcao)


A second unexpected trip to Pocone last week yielded another visit to the engineer who provided a list of materials needed for the foundation and concrete structural support. We were also able to return to the construction supplies store to get an exact quote. There are some discrepancies with numbers which we need to clarify with the engineer, but the quotes are pictured here to give an idea of the materials and approximate quantities that will be used. While this information is helpful in understanding local materials used and likely construction processes to ensue, we still have many more questions for the construction supervisor and engineer, both of whom we will be meeting with tomorrow. Eduardo Falcao De Arruda (Owner of Jaguar Eco Lodge and site of project) has also had much input and insight into the local construction and logistic processes and is recommending a construction supervisor (pedreiro) who has recently built two structures at the lodge. While we have been waiting to meet with the construction supervisor, we have been building detailed 3D models of the structure and roof system based on the materials that will be used as well as the local construction methods that we have learned about based on buildings we have seen, our conversations with the engineer, conversations with the construction store manager, and with other local well-informed building owners.

Here are some of the questions we have for the engineer and construction supervisor:

What are the extents of the slab? Building footprint? Breezeways? Roofline? Roofline, and then some?
What is the slab thickness?
Is there rebar or reinforcement of any sort in the slab?
What size rebar goes where? And how many – how many in the columns (1, 2, 4?) and how many in the bond beams?
What is the maximum spread for the columns?
Is there footing under columns? All the columns? What kind of footing?
If the typical dimension for a beam is 10 by 20 by 4m, then why is the beam drawn in the truss elevation 12 cm?
What happens between the bond beam and the door? – Brick? Netting?
What is the height of the bond beam?
What is the approximate space below the netting/window (even though this is flexible, it would be good to know what they were thinking in order to understand the estimates)?
What accounts for the width difference between the column and brick? Even if there is a stucco finish, there is a difference in width.
What is the dimension of the mortar joint?
What is the typical order of building?
What type of formwork is used?
What kind of tools will you (the construction supervisor) bring to the site? What tools do we need to get?

Wednesday, June 9, 2010

Week 1-2


We paid a visit to the construction supplies store that will be providing the materials for the project. This gave us a better idea of what would be available to us and the concrete mixture typically used = 6 sand, 3 gravel, 1 cement. We should be connecting with the contractor/construction supervisor very soon to determine an exact start date. We met with the engineer to approve the final drawings and discuss the details of the structural system. Pictured are the final drawings given to us by the engineer. We will post diagrams of exactly how the roof members come together soon. “Soon” is as specific as it gets here. We returned to the Jaguar Reserve to discover the site unexcavated. We are sure it will get done soon though.